Roasted Corn Salad with Fresh Herbs

Roasted Corn Salad with Fresh Herbs

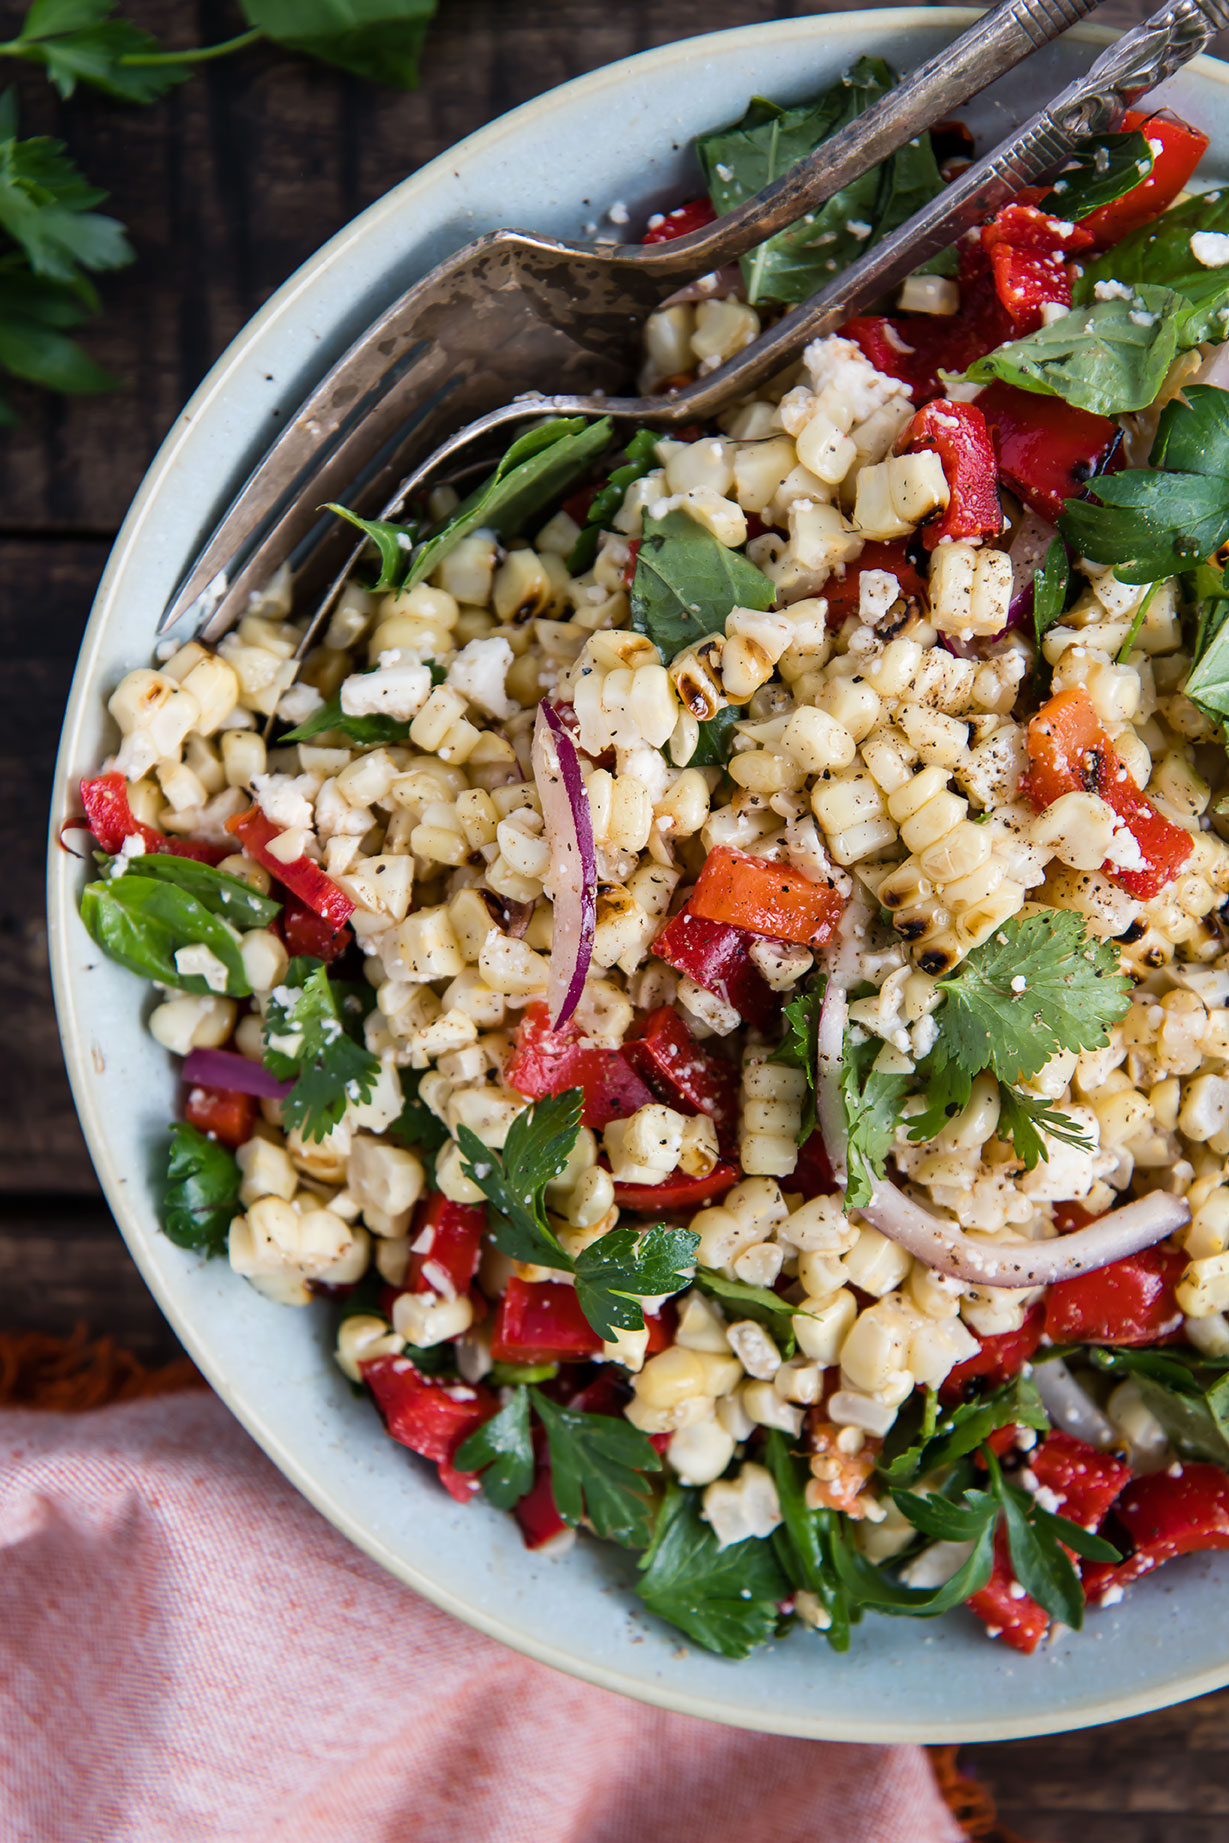
Real summer is still a ways off, but we’ve been eating like it’s already here. An over-sized watermelon eaten in wedges, grilling every evening for dinner, and lots of fresh greens and herbs. This roasted corn salad includes a lot of quintessential summer ingredients. I wanted to publish it early in the season so you could take advantage of the first corn at the market. Grilling the corn and red bell pepper give a great toasted/caramelized flavor, while using a mix of herbs—basil, cilantro and parsley—add freshness to every bite. I used queso fresco, but if you’re unable to find that at your local grocery store, try feta or goat cheese crumbles.

Roasted Corn Salad with Fresh Herbs

Roasted Corn Salad with Fresh Herbs

Published June 4, 2019 by
   Print This Recipe

Serves: 4-5   |    Active Time: 30 minutes


Ingredients:

  • 4 corn cobs
  • 1 large red bell pepper
  • 1/2 cup queso fresco, crumbled
  • 1/4 heaping cup cilantro leaves
  • 1/4 heaping cup parsley leaves
  • 1/4 heaping cup basil leaves
  • 1/4 of a red onion, sliced thin
  • 2 tablespoons extra virgin olive oil
  • 1 tablespoon apple cider vinegar 
  • Salt to taste
  • Ground black pepper to taste

  • Directions:

    1. Preheat grill to medium-high heat.
    2. Remove husks and silk from corn. Cut bell pepper in half and remove stem and seeds.
    3. Place corn and pepper on grill. Cook for 15-20 minutes, turning occasionally, until outside is brown in spots. Remove from heat.
    4. Allow pepper and corn to cool enough to handle (you can speed up the cooling process by placing them in a bowl with cool water).
    5. Dice roasted pepper, and place in serving bowl. Cut corn kernels from cobs, and place in bowl.
    6. Add queso fresco, herbs, red onion, olive oil, and vinegar to bowl, and toss. Season to taste with salt and pepper to taste.
    7. Serve.

    Comment

    Roasted Summer Veggies with Parmesan Polenta

    Roasted Summer Veggies with Parmesan Polenta

    Ina Garten’s recipe for parmesan polenta got me over my aversion for all things polenta. I had never been a fan of the gooey textured stuff before, but I had been missing something key: enough butter, cream, and parmesan. That, and the right toppings. This meal brings it all together—a creamy polenta base, which serves a two-part role as sauce and substance; and roasted summer veggies, which benefit from (and compliment) the creaminess of the rest of the dish; pine nuts, which add much-needed crunch. I’ve made it four times in the last month, a testament to how well I’ve been converted from polenta-hater to lover. Maybe it will convert someone you know, too.

    Roasted Summer Veggies with Parmesan Polenta
    Roasted Summer Veggies with Parmesan Polenta

    Roasted Summer Veggies with Parmesan Polenta

    Published May 30, 2019 by
       Print This Recipe

    Serves: 4   |    Active Time: 45 minutes


    Ingredients:

    For Roasted Summer Veggies:
  • 1 medium eggplant
  • 1-2 small to medium zucchini
  • 2 red bell peppers
  • 1 cup cherry tomatoes
  • 1/2 medium red onion
  • Leaves from 2 sprigs thyme or 1 teaspoon dried thyme
  • 2-3 tablespoons olive oil or avocado oil
  • Salt & Pepper

  • For Parmesan Polenta:
  • 4 cups water
  • 1 clove garlic, minced
  • 1 teaspoon salt
  • 1 cup coarsely ground or stone ground cornmeal
  • 3 tablespoons butter
  • 1/2 heaping cup finely shredded Parmesan cheese
  • 1-2 tablespoon heavy cream (or milk)
  • Ground black pepper to taste

  • For Serving:
  • 2 tablespoons toasted pine nuts
  • Garnish: additional shredded Parmesan cheese, additional sprigs of thyme

  • Directions:

    1. Preheat oven to 475°F. Prepare veggies: dice eggplant into 1/2-inch cubes. Slice zucchini into half moons. Slice bell peppers into strips. Slice red onion into wedges.
    2. Place chopped veggies and cherry tomatoes on a sheet pan in a single layer. Use two sheet pans if veggies are over-crowding the pan. Drizzle liberally with oil, and toss to coat. Sprinkle with salt, pepper and thyme leaves.
    3. Place veggies in oven and roast for 30 minutes, stirring after 15 minutes to ensure even cooking.
    4. When the veggies have 15 minutes left to cook, begin preparing the polenta. Bring 4 cups of water in a pot to a boil. Add salt and garlic.
    5. When water is boiling, add cornmeal, whisking immediately to prevent clumps from forming. After a few minutes, polenta should begin to thicken. Continue whisking, and remove from heat. Continue stirring almost constantly for about 10 minutes.
    6. Add butter, Parmesan cheese, and cream to polenta, stirring to incorporate. Polenta should become thick and creamy, and will continue to set as it cools. Season to taste with pepper.
    7. Serve: scoop polenta into serving bowls, and top with roasted veggies. Sprinkle with pine nuts and parmesan and a garnish with a sprig of thyme. Serve hot.

    Comment

    Leftover Turkey Enchiladas

    Leftover Turkey Enchiladas

    It’s not Thanksgiving for another week. I know. But here’s what else I know: when the day comes, and you eat everything delicious (stuffing, pie, turkey, gravy, potatoes, etc etc etc), there are going to be leftovers. (What’s Thanksgiving without leftovers?!)

    And the day after Thanksgiving, maybe you’ll want another round of traditional Thanksgiving fare, but after a few days, you’ll want to mix it up. And you’ll want to be prepared, because going to the store in that moment isn’t the answer (when you are tired from the holiday, and have plenty of turkey in the fridge and just need something to do with it). That’s where this recipe comes in.

    (I’m going to admit right now that I’m more excited about using leftover turkey in enchiladas than I am about actual Thanksgiving Turkey right now. Maybe you’re a turkey purist. But this is true: enchiladas are really hard to beat.)

    Leftover Turkey Enchiladas

    Now, last year when I started making enchiladas more frequently, my dad asked me if I was frying my tortillas. He said, you have to fry your tortillas. It’s far superior. And I remember the days of making enchiladas along side him — him frying the tortillas, and me, stuffing and rolling them and trying to keep up. And they were delicious.

    But this recipe doesn’t ask you to do that. What’s with that? Well, this recipe is a more “get these enchiladas made tonight,” “get dinner on the table,” type of recipe. Frying tortillas definitely takes a bit more commitment (and you must deal with that dreaded pot of hot, used oil when you are done!). And you know what? Even when you skip the frying part, they’re still delicious.

    So if you, like me, are trying to get dinner on the table, or hate slaving over a pot of boiling oil, try the sauce method. The sauce method is just easy enough that suddenly making enchiladas is something I do on a slow afternoon, rather than a production that requires planning and multiple hands and a commitment to the craft. Simplifying that one step makes enchiladas just that much more accessible for me.

    If you do want to fry your tortillas (🙌 good work!) you’ll have to change up step 4 in the recipe below. You’ll need to heat up a pan with enough frying oil to dip a tortilla into it, and you’ll want to set up a place to let the fried to tortillas drain. We always used a plat stacked with paper towels, which soak up excess grease. Once the oil is hot, you’ll want to use tongs to place tortillas one at a time in the hot oil. Fry for 5 seconds on each side, and then set on the prepared plate. Many hands make for fast work. The reason why this was practical (and fun!) when I was a kid was that there were two of us: my dad would do the frying while I would do the stuffing. If you don’t have the luxury of a friend or helper in the kitchen, you can fry all the tortillas, placing them in a stack, and then stuff them. Placing them in a stack will help keep them soft. But again, if you just want some enchiladas now, use the sauce method in the recipe below.

    Leftover Turkey Enchiladas

    P.S. The turquoise casserole dish in these images is my newest kitchen toy, and I love a) how well it cooks things, b) it’s rustic style, and c) the color. I got it on Amazon (affiliate link!).

    P.S.S. Enchiladas SCREAM Christmas to me. I guess it’s a family thing. So, you can also use chicken in this recipe if you no longer have leftover turkey around. I use chicken in enchiladas all the time!

    Leftover Turkey Enchiladas

    Published November 13, 2018 by
       Print This Recipe

    Serves: 6-8   |    Active Time: 60 minutes


    Ingredients:

  • 3 cups shredded leftover turkey or chicken breast
  • 1 teaspoon coconut oil
  • 1 cup diced onion
  • 2 teaspoons minced garlic
  • 1/4 cup minced cilantro, plus more for garnish
  • 1/4 teaspoon salt (or to taste)
  • 1 teaspoon ground cumin
  • 1/2 teaspoon dried oregano
  • 1 teaspoon chipotle chili powder
  • To assemble:
  • 2 cups enchilada sauce
  • 1-1/2 cups shredded cheese (try Colby Cheese, Monterrey Jack Cheese or a mix of the two)
  • 16-20 six-inch corn tortillas

  • Directions:

    1. In a skillet, heat the coconut oil over medium heat until it sizzles. Sauté onion and garlic in oil until onions are translucent, and then remove from heat.
    2. In a medium mixing bowl, combine: shredded turkey, onion and garlic, cilantro, salt, cumin, oregano, and chili powder. Mix to combine and set aside.
    3. Preheat oven to 350°F. While the oven heats, assemble the enchiladas.
    4. Work with one tortilla at a time. Dip a tortilla into the enchilada sauce and allowing the tortilla to soften for 20-30 seconds. This helps the tortillas from cracking as you roll them (they still might a little bit, though once it's all baked up no one will know). Then, scoop 2-3 tablespoons of the turkey mixture into the middle of the tortilla, and roll it around the filling. Place the rolled enchilada seam-side down in a baking dish.
    5. Repeat step 4 until all of the turkey and tortilla mixture is used. Then, pour remaining enchilada sauce over the enchiladas, and top with shredded cheese.
    6. Bake enchiladas for 20 minutes, until cheese and sauce are bubbling and edges of tortillas are starting to crisp.
    7. Allow to cool for 5 minutes, and then garnish with minced cilantro and serve warm.

    Comment