Soy Ginger Salmon with Rice & Broccoli

Soy Ginger Salmon with Rice & Broccoli

Warm days are coming. And boy, do we need it. Because while many of us are still practicing stay-at-home or safer-at-home, the outdoors are a welcome breath of literal fresh air. Why not take advantage of the sunny days to come and also cook outside? And if you can—if you also have a picnic table, or even just an accommodating step, eat outside, too.

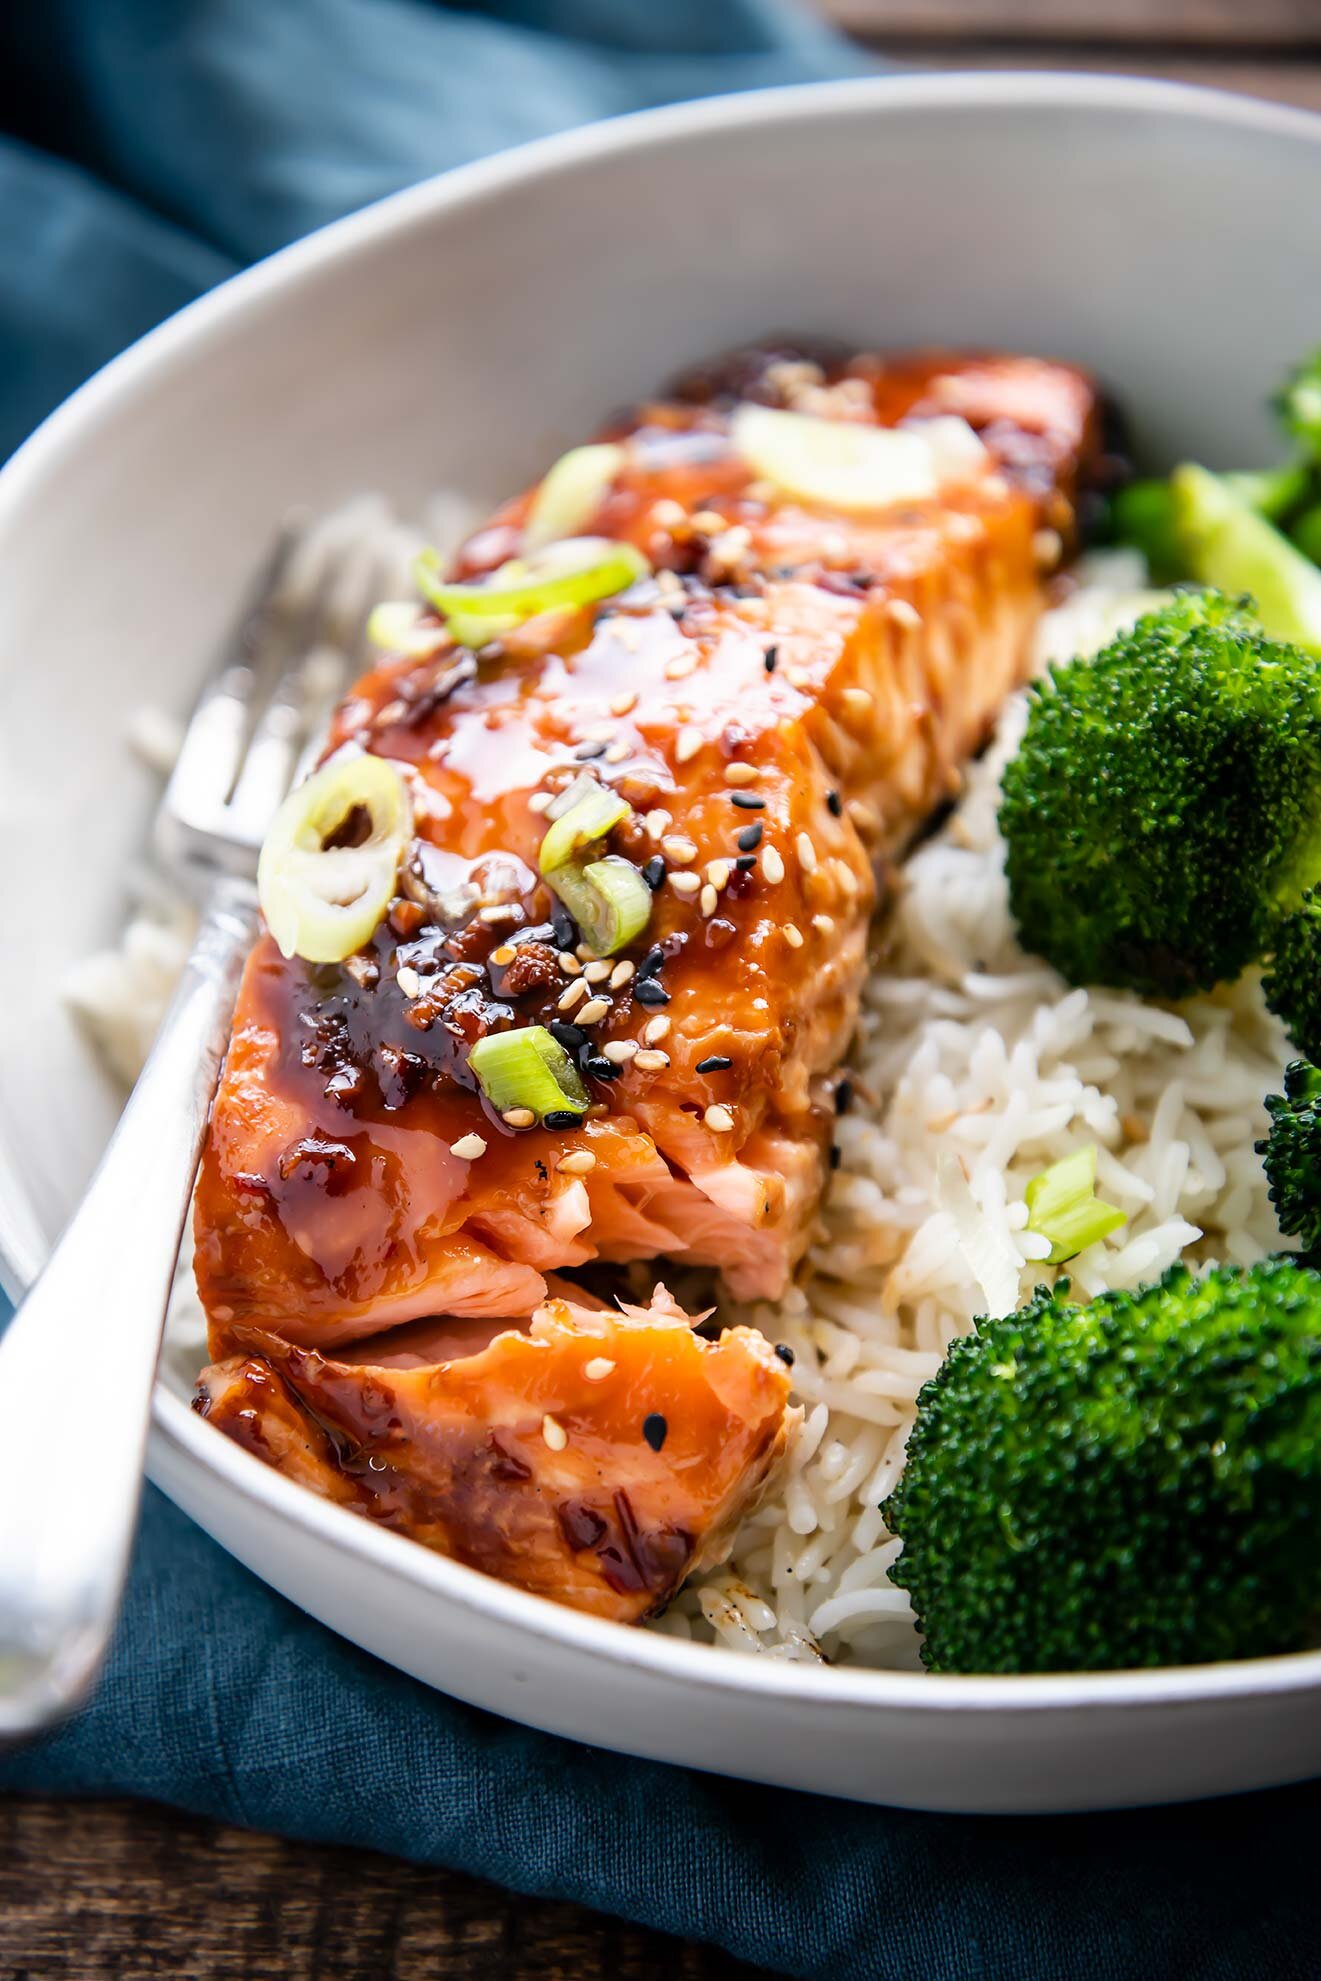
This salmon: smothered in a salty-umami-sweet-sticky sauce, is served over rice with a side of grilled broccoli. It couldn’t be more simple. But a good fillet of salmon doesn’t need much to shine, and this sauce—well, you’ll want to make some extra. Drizzle it over the broccoli for an extra pop of flavor there, too.

Soy Ginger Salmon with Rice & Broccoli

Soy Ginger Salmon with Rice & Broccoli

Published May 12, 2020 by
   Print This Recipe

Serves: 4   |    Active Time: 30 minutes


Ingredients:

  • 1/4 cup soy sauce
  • 2 tablespoon maple syrup
  • 1/2 teaspoon corn starch
  • 1 teaspoon Sriracha
  • 1 clove garlic, finely grated (on a microplane)
  • 4 quarter-sized sliced of fresh ginger
  • 4 four-ounce pieces of salmon
  • 1 head of broccoli, roughly chopped into large pieces
  • 2 tablespoons cooking oil, such as avocado or olive
  • Generous pinch of salt
  • 2-3 cups rice, cooked
  • 3 green onions, sliced
  • 2 toasted sesame seeds

  • Directions:

    1. In a small sauce pan, whisk together soy sauce, maple syrup, corn starch, Sriracha, and finely grated garlic. Place on stove over medium heat. Add ginger coins, and bring to a simmer. As the sauce bubbles, it will thicken. Cook sauce, stirring frequently, until it is thick enough to coat the back of a spoon well. Remove from heat, and use a fork or spoon to remove and discard the ginger coins.
    2. Heat grill to about 450°F.
    3. While grill heats, toss the broccoli with the cooking oil to coat, and season with a generous pinch of salt.
    4. Use a brush to coat the top of the salmon with about half of the soy sauce mixture. Using tongs, place salmon on pre-heated grill, skin-side down, along with broccoli
    5. Turn flame down to medium, and close lid, cooking the salmon for 6-8 minutes.
    6. Using tongs, turn broccoli to the second side. Then, brush the salmon with remaining soy sauce mixture, and close grill lid again, cooking for another 4-5 minutes, or until internal temperature of salmon reaches 130°F, easily flakes, and is opaque in the center. Transfer to a plate and allow to rest for 1-2 minutes.
    7. While the salmon and broccoli cook, prepare rice according to your preferences.
    8. Divide rice among serving plates. Top with salmon and broccoli. Sprinkle with sesame seeds and green onions. Serve.

    1 Comment

    Broccolini & Tofu in Chili Garlic Sauce

    Broccolini & Tofu in Chili Garlic Sauce

    Here is a recipe I’ve been cooking a lot lately, because it’s quite easy and also checks all the boxes (veggies, protein, lots of flavor). Though, I’ve learned some lessons along the way:

    • Broccoli rabe and broccolini are not interchangeable. While they seem similar at first glance, broccoli rabe is more like mustard greens—spicy and leafy, and the flavor overwhelms this dish. Opt for broccolini, and if you can’t find it, go for regular broccoli.

    • A clean towel from your pantry is just fine for drying your tofu. I’ve never gotten my tofu very dry before, because we don’t keep paper towels in the house and I always hesitated to use a kitchen towel. But in the January edition of Bon Appetit the suggested a clean towel in their tofu recipe, so I went for it, and now I’m not really sure what my previous hesitation was all about. (And yes, dry your tofu! It’s how you’ll get those nice edges!)

    • Add the garlic to the pan (not the marinade) for maximum roasted garlic flavor. Add the marinade to the pan at the end of cooking for that sauciness that’s so delicious. While we’re talking about sauce, here’s something else: broccolini is ideal for sauce, because it has all these nooks and crannies that soak up sauce (in other words: bites of broccolini are extra flavorful).

    Broccolini & Tofu in Chili Garlic Sauce
    Broccolini & Tofu in Chili Garlic Sauce

    Broccolini & Tofu in Chili Garlic Sauce

    Published January 21, 2020 by
       Print This Recipe

    Serves: 4 with rice   |    Active Time: 30 minutes


    Ingredients:

    For the marinade/sauce:
  • 3 tablespoons soy sauce
  • 4 tablespoons sambal olek (chili-garlic sauce)
  • 2 tablespoons toasted sesame oil
  • 1 tablespoon maple syrup
  • 1 teaspoon rice vinegar

  • For the stir fry:
  • 1 fourteen ounce block extra-firm tofu
  • 1 clove garlic, minced
  • 1 bunch broccolini or 1 head broccoli, chopped into 1-2 inch pieces (note: I do not recommend broccoli rabe for this dish, which has a much stronger flavor that broccolini, and overwhelms the dish)
  • 1 teaspoon coconut oil
  • 2 green onions, sliced, plus more for garnish
  • 2 tablespoons minced cilantro, plus more for garnish
  • 2 tablespoons sesame seeds
  • For serving: cooked brown rice

  • Directions:

    1. Drain water from tofu, and wrap in a clean kitchen towel to remove excess liquid. Cube tofu into bite-sized pieces.
    2. Combine all ingredients for sauce in a medium-sized bowl or pyrex, and stir. Add tofu to sauce, cover, and place in fridge for at least 30 minutes (or all day, until ready to cook).
    3. When ready to make stir fry: heat coconut oil in a large skillet or wok or medium heat. Add minced garlic, and cook until it just begins to brown.
    4. Using a fork or slotted spoon, remove tofu from sauce, allowing excess to drip off. Place in pan (there may be some splattering). Cook tofu for 5 minutes, until tofu begins to brown on one side. Use a spatula to turn tofu over, and cook 3-4 more minutes.
    5. Add chopped broccolini to pan. Cook for 3-4 minutes. Drizzle remaining marinade over stir fry, along with sliced green onions. Stir briefly, and continue to cook for a few more minutes until broccolini is bright green and tender.
    6. Sprinkle with cilantro and sesame seeds.
    7. Serve: Scoop prepared brown rice into bowls, and top with stir fry. Add additional green onions, cilantro, and sesame seeds as garnish.

    Comment

    Warm Gruyère, Roasted Garlic & Thyme Dip

    Warm Gruyère, Roasted Garlic & Thyme Dip

    It is about 21°F this morning. The cold always me makes me crave crave warm, cozy dishes. This gruyère, roasted garlic and thyme dip  is just the thing to take to a New Years Eve cocktail party, or simply enjoy on the sofa after a long day, with your feet kicked up (build a fire in that fireplace, while you’re at it!).

    I went to a cocktail party this fall (potluck style), and there were at least three different spinach and artichoke dips! Tasting and comparing them all was fun, but really? Three versions? Seems everyone was on the same page that night. I LOVE spinach artichoke dip, and this dip hits the same craving but mixes it up a bit.

    Warm Gruyère, Roasted Garlic & Thyme Dip
    Warm Gruyère, Roasted Garlic & Thyme Dip

    The first step in this recipe is to roast a whole head of garlic. Have you roasted garlic before? YUM. It becomes golden and soft and spreadable. I roasted an extra head of garlic while I was making the one for this dip just so we could have it. It makes the best garlic garlic bread or compound butter. You may as well make the most of having the oven on!

    Surprisingly, even with a whole head of garlic in this dip, it’s a subtle flavor — not a “I’m going to be breathing garlic for the rest of the night,” flavor. The gruyère and cream cheese soften it. Thyme adds an herbaceous note. The leftovers (if you have leftovers — in the realm of cheese that’s a rare story) do well as a sandwich spread or tucked inside of an omelette with sautéd mushrooms.

    Warm Gruyère, Roasted Garlic & Thyme Dip
    Warm Gruyère, Roasted Garlic & Thyme Dip

    The new year is almost here! Wishing everyone a joyful 2019!

    Warm Gruyère, Roasted Garlic & Thyme Dip

    Published December 7, 2018 by
       Print This Recipe

    Serves: 6   |    Active Time: 75 minutes


    Ingredients:

  • 1 head of garlic
  • 1 teaspoon olive oil or avocado oil
  • 8 ounces sour cream, at room temperature
  • 2 ounces cream cheese
  • 2 ounces gruyère, finely grated, plus 2 tablespoons for topping
  • 1/8 teaspoon salt
  • 1/4 teaspoon freshly cracked black pepper
  • 1 teaspoon fresh thyme leaves
  • 1 tablespoon minced parsley for garnish
  • For serving: crudités, crackers, crusty bread, etc.

  • Directions:

    1. First, roast the garlic: preheat oven to 350° F. Chop the very top off of the head of garlic. Place on a baking sheet and drizzle with the olive/avocado oil. Place in oven and roast 45 minutes, until cloves are golden and soft.
    2. Allow garlic to cool until you can easily touch it without burning your hands, about 15 minutes. Squeeze garlic cloves into a medium-sized mixing bowl, discarding of the garlic papers. Mash garlic.
    3. Add sour cream, cream cheese, 2 ounces gruyère, salt, black pepper, and thyme to bowl. Use a fork to mix until well combined.
    4. Spread cheese mixture in a ramekin or cocotte dish. Do not over fill—make sure there is at least 1/4-inch of extra room in the dish to avoid bubbling over. Top with remaining 2 tablespoons gruyère, and place in oven and bake for 20-25 minutes, until cheese is bubbling and just starting to brown in spots on the top.
    5. Remove from oven and allow to cool 10 minutes before sprinkling with minced parsley and serving with crudités, crackers, or crusty bread.
    6. Leftovers? Eat them cold as a spread on toast, sandwiches, etc, or re-warm the dip in the microwave for 30-second intervals or in an oven until warmed through.

    Comment