Vegan Dinner Miso Soup

Vegan Dinner Miso Soup

Last week, we woke up to rain. And it rained and rained until about 10am when the temperature dropped and the winds started and it began to snow sideways.

It was a perfect storm for Miso Soup.

Typical miso soup is light — really nothing more than an appetizer. With this recipe I sought out a miso soup that was filling. Something you could have as a meal when you’re snowed in. Traditional miso soup usually has a few bites of tofu, and pieces of wakame. We added: shiitake mushrooms, rice noodles, and TOPPINGS! (Fried garlic chips, green onions, chili crunch sauce, toasted sesame oil). All in all it makes a more filling soup with out losing the miso-y quality. Despite the add ins, this soup is still vegan (some add bonito flakes to miso soup, I opted for dried mushrooms).

I know warm weather is on it’s way — but until then, I’ll be souping. :)

Vegan Dinner Miso Soup

Vegan Dinner Miso Soup

Published March 19, 2019 by
   Print This Recipe

Serves: 6   |    Active Time: 50 minutes


Ingredients:

For the broth (dash):
  • 2 sheets kombu (About 5 inches x 3 inches each)
  • 6 dried shiitake mushrooms
  • 7 cups water 

  • For the soup:
  • 1/3 cup white miso paste
  • 1 tablespoon ginger juice
  • 2 tablespoons dried wakame, plus about 2 cups of water for rehydrating
  • 1-2 cups sliced shiitake mushrooms, stems removed
  • 14 ounce package extra firm tofu, drained and diced into bite-sized pieces

  • To serve:
  • Rice noodles, cooked according to package (I used vermicelli)
  • 1/2 cup sliced green onions, white and dark green parts removed
  • Chili crunch sauce (affiliate link)
  • Fried garlic chips (I use avocado oil rather than canola)
  • Toasted sesame oil
  • Optional (not vegan - makes the meal heartier): Soft boiled eggs

  • Directions:

    1. Make broth: heat 7 cups of water in a large soup pot with kombu and dried mushrooms. Once the water comes to a boil, remove it from the heat. Allow kombu and mushrooms for roughly 20 minutes.
    2. Meanwhile, hydrate wakame in a small bowl. When wakame is completely softened, strain out excess water. Then, roughly chop wakame into bite-sized pieces.
    3. After broth has soaked, use a slotted spoon to remove kombu and mushrooms.
    4. Place miso in a small to medium sized bowl. Ladel roughly 1 cup of broth in the bowl with the miso, and whisk until no clumps remain (this makes it easier to mix into the full pot of broth). Pour miso mixture into soup pot.
    5. Add tofu, shiitake mushrooms, and wakame to the pot, and place back on stove over low heat. Heat until the soup is just barely simmering.
    6. Divide rice noodles amongst serving bowls, and label soup over top. Top to taste with: sliced green onions, toasted sesame oil, chili crunch sauce, and fried garlic (and eggs, halved, if using).

    Comment

    Curtido, a recipe from Latin American Paleo Cooking

    Latin American Paleo Cooking: Curtido

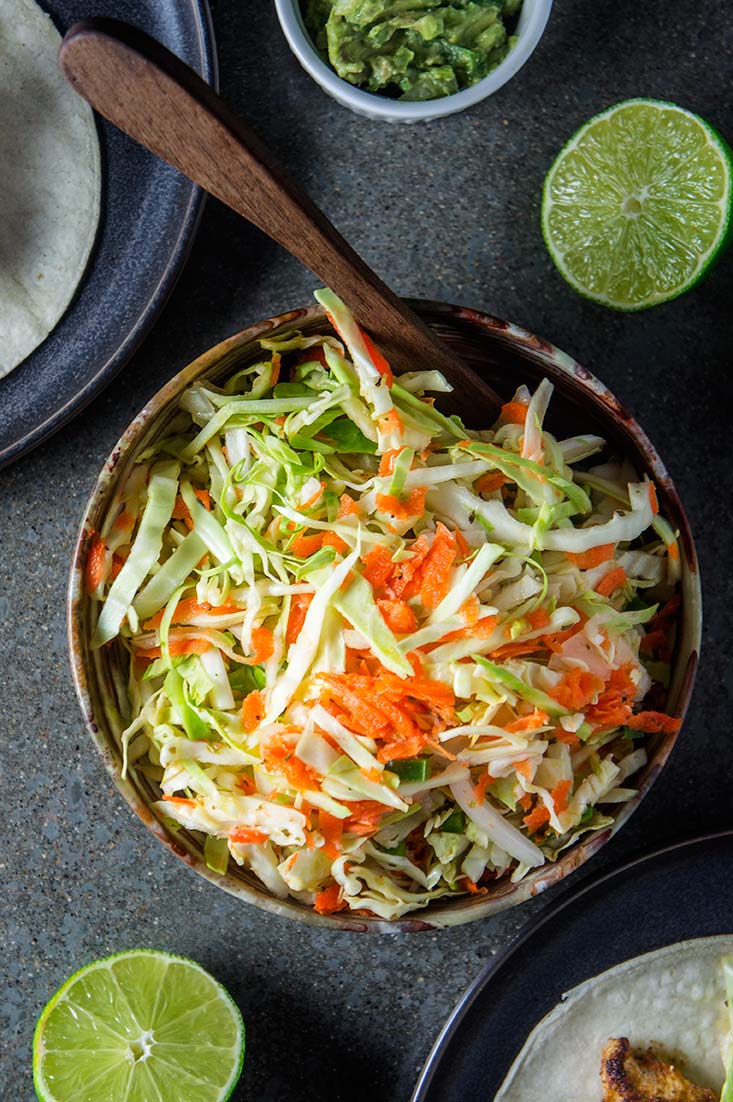
    The best tacos I've ever had were served to me at a gas station in the mountain town of Glenwood Springs, CO. Let me guess.... you thought I was going to say something like, "on the streets of Mexico City" or "at this hole in a wall restaurant in Texas, just north of the border." Nope. A gas station in Glenwood Springs, while waiting for a bus. I know, that's just not as cool. But they were $1.00 each and simple. Super simple. Just a bit of shredded chicken on a 4-inch corn tortilla topped with this Mexican cabbage slaw that added acidity, crunch and freshness. That was my first taste of Curtido, and my last--at least for some time.

    Latin American Paleo Cooking: Curtido

    I didn't happen across curtido again until I visited Nicaragua, and then, boy, did I eat curtido. Many people credit El Salvador with this brilliant recipe, but it's eaten all through Central America. In Nicaragua, it came with virtually every dish I ate. Finally, towards the end of my stay, I attended a cooking class where sure enough, we learned to make curtido from a well seasoned abuela. Everything was done by hand: what most of us would do in a food processor, she did with ease on a small cutting board. She sliced that cabbage with more finesse than I've ever sliced anything in my life. The result was ribbons of cabbage were the most delicate, long and beautiful pieces of cabbage I had ever seen. (Every time I slice cabbage now I think of her, and attempt to mimic her motions. I still haven't mastered the skill). 

    Latin American Paleo Cooking: Curtido

    When Latin American Paleo Cooking cookbook showed up at my front door, and this recipe sat within its pages, I knew I needed to make it stat. Taco night anyone?

    Getting your fair share of veggies on taco night is not always easy (some days you just don't feel like taco salad). But curtido! It's the answer. When you make curtido, you put your veggies in your taco, and it's the most delicious taco you'll eat. It's the crunch, acid, and spice your taco needs. And the recipe in this cookbook is awesome... along with the rest of the recipes in there. Want to hear a few? 

    • Mofongo Relleno de Camarones - Mofongo Stuffed with Shrimp 
    • Empanadas al Horno - Baked Meat Empanadas 
    • Pupusas con Chicharrón - Pupusas stuffed with sausage (or cheese!)
    • "Arroz" con Dulce - Grain-free rice pudding 
    • The list goes on...

    So, if you have been on a grain-free diet for a while (or not that long) and are seriously craving some real Latin American food, this cookbook is for you. (I can relate to your cravings... case in point: those tacos in Glenwood Springs! And enchiladas. And tamales. Don't get me started on tamales. This cookbook is totally the answer to your cravings). 

    You can get it on Amazon, here

    Latin American Paleo Cooking: Curtido
    Latin American Paleo Cooking: Curtido

    YC Media sent me this cookbook to review. Thoughts and opinions are all my own. 

    Curtido

    Published October 17, 2017 by
       |     Print This Recipe

    Serves: 4-6   |    Total Time: 20 minutes


    Ingredients:

    • 1 small head green cabbage, sliced very thinly or grated
    • 4 carrots, grated
    • 1 medium onion, thinly sliced and cut about 1" (2.5 cm) long
    • 2 fresh jalapeño peppers, diced and seeded, or 1 to 2 cloves garlic, minced
    • 2 tsp (12 g) fine Himalayan salt
    • 2 tsp (4 g) dried oregano
    • ½ cup (120 ml) filtered water
    • ½ cup (120 ml) apple cider vinegar

    Directions:

    1. In a large, nonreactive bowl, combine all the ingredients and stir well. Depending on how large your cabbage is, you may need to add a bit more vinegar and water. Place it in the fridge for 15 minutes before serving. The flavors will continue to develop as it sits. Serve a generous portion alongside Pupusas con Chicharrón o “Queso” (page 63 of the Latin American Paleo Cooking cookbook)
    2. Store in an airtight container in the fridge for up to 3 to 4 days.
    3. AIP compliant: Simply omit the jalapeño peppers and substitute minced garlic.

    Comment

    Paleo Nori Rolls

    If you've never had Nori Rolls before, go ahead and add nori to your grocery list right now. While you're at it, do an inventory of the vegetables in your fridge. If you don't already have them, add carrots, cucumber, lettuce, and cilantro to your list. Why are these rolls a must-make recipe this week? Well...

    1. They're versatile and adaptable. Out of carrots? Try shredded beet. Have extra avocado? Add it in (really, add it in--you'll be so glad you did). 
    2. They come together in a flash. You might at first think that all of the vegetable chopping in this recipe makes it a slow going ordeal, but once things are cut, you're 90% of the way there. I use leftover chicken, canned tuna, or sushi-grade fish as a protein for my Nori Rolls, which means no cooking necessary (and hey, more versatility!). 
    3. Summer just popped up out of no where, and this is one tasty way to cool off. (Ok maybe summer didn't pop up out of no where but it sure feels like it stormed in before it was supposed to, doesn't it?)
    4. Spicy Thai Almond Butter Dipping Sauce. Enough said. 
    5. (If you even need a fifth reason--I know I don't). Seaweed is high in calcium and a good source of iodine, which you might need if you rarely eat regular iodized table salt. 

    Even though this is not a sushi recipe, it reminds me of bringing sushi for lunch in elementary school. The other kids would gawk: What is that? I'd feel slightly ashamed, but keep eating because I knew my sushi was better than their PB&J. These days no one gawks if I bring this for lunch, at least not in a negative way. If they are gawking, it's because they're thinking they want a bite. 

    Hey, was that a number 6? 

    6. Be the cause of everyone's lunch envy ;) 

    Paleo Nori Rolls

    Paleo, Gluten-Free, Grain-Free,   |       |    Print Friendly and PDF

    Nori Rolls are perfect for showcasing farmer market finds or home grown crops. This recipe is a great starting point, but don’t let it stop you from trying other things out! Basil and avocado are both definite yeses, but even sprouts or roasted sweet potato cubes could be good.

    Yields: 8 rolls   |    Total Time:


    Ingredients:

    • 1/2 cucumber
    • 2 carrots
    • 1/4 cup cilantro leaves
    • 4-inch piece of diakon radish
    • 4 romaine lettuce leaves
    • 1/2 cup leftover chicken, 1 can of tuna, or 3 ounces sushi-grade fish
    • 1 green onion
    • 4 sheets of Nori
      For the sauce:
    • 2 tablespoons creamy almond butter
    • 1 tablespoon soy sauce
    • 1 teaspoon lime juice
    • 2 teaspoons sesame oil
    • 1 tablespoon canned coconut milk
    • 1-2 teaspoons red hot sauce or a few dash of cayenne (adjust this to your spice-preference

    Directions:

    1. Prepare the vegetables: Shred the carrots in a food processor, and julienne the radish and cucumber. Slice the romaine vertically to make long strips, chopping off any tougher parts (you can discard these, or julienne them like the other vegetables). Slice the green onion into thin rounds, and minced the cilantro.
    2. Prepare the protein: if using leftover chicken or sushi fish, slice it into thin slices. If using canned fish, break it into chunks with a fork.
    3. Assemble rolls: lay a single sheet of nori in front of you. If you have a sushi mat, use it now (it is not necessary, but may make your life easier). Pour a small amount of water into a small bowl and set next to your workspace. Arrange a few tablespoons of shredded carrot, a few julienned vegetables, cilantro and green onion, and a small amount of protein in a row along the edge of the nori sheet that is closest to you. Then, began to roll the nori over, in the “away from you” direction. Continue to roll, gently but tightly, until almost all of the nori is rolled up. Now, use your fingers to rub a very small amount of water on the open edge of the nori paper (use the water from the small bowl you filled). Finish rolling the nori, gently pressing the moistened bit to the rest of the roll (the water will help the nori stick). Finish by using a sharp knife to cut the roll in half, revealing the pretty inside.
    4. Repeat with remaining ingredients.
    5. Prepare the sauce: Whisk together the ingredients for the sauce. Adjust to taste as desired.
    6. Keep in airtight container in fridge until ready to serve. (Remember, sushi-grade fish should to be eaten with in two days.)

    6 Comments