Instant Pot Fall Harvest Minestone Soup

Instant Pot Fall Harvest Minestone Soup

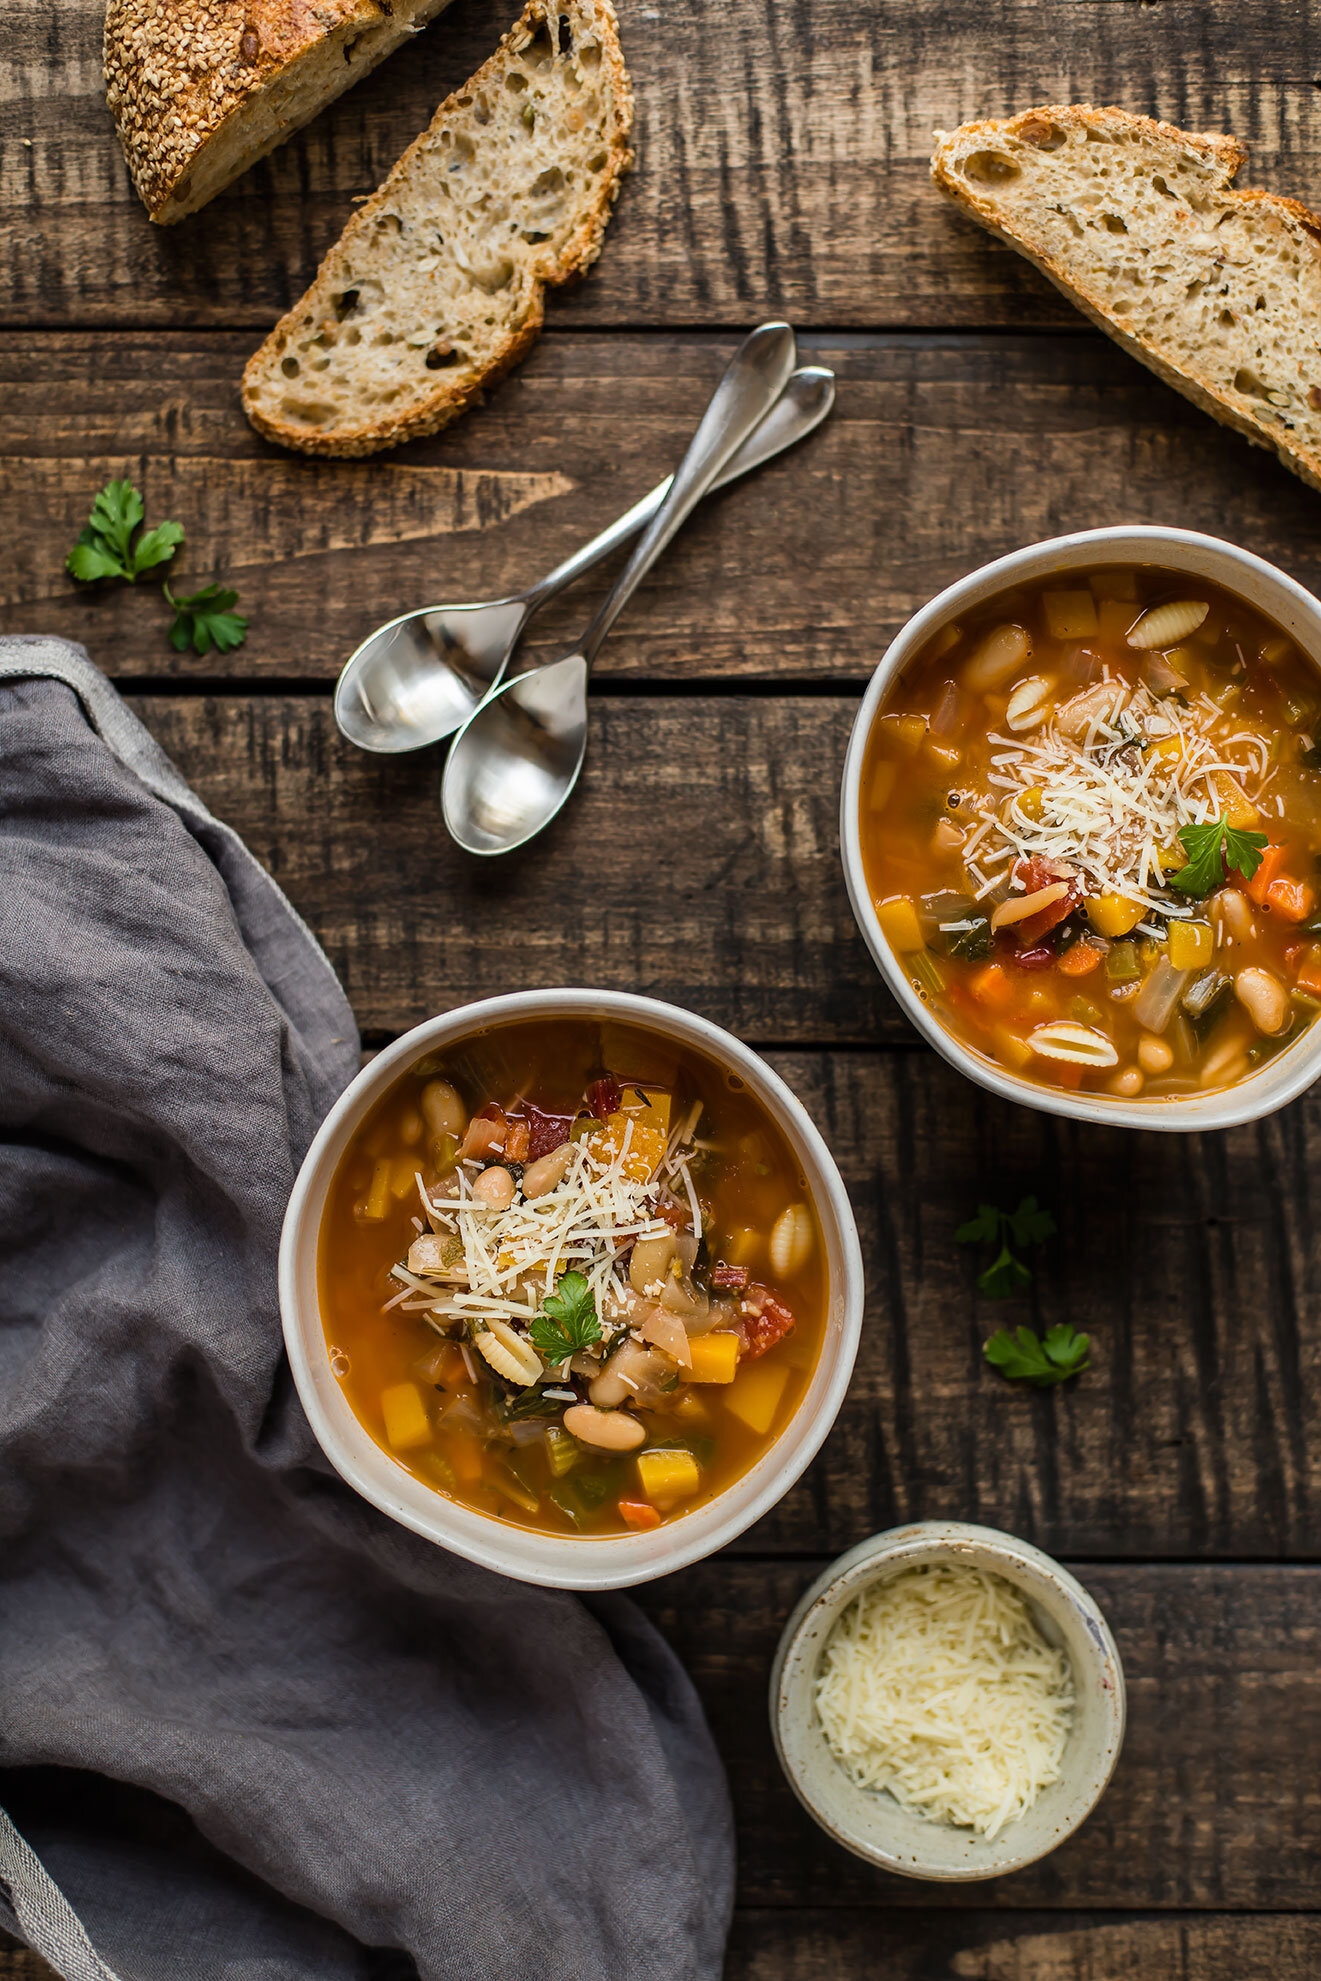
While we were on vacation, we made this Minestrone recipe, originally from Ina Garten. It was super satisfying, especially because the weather was cold up north! The day we arrived back at home, we harvested all of the remaining veggies from our own yard—snow was on the way. Our crop this year included over 20 winter squash, and a giant pile of swiss chard. With Ina’s recipe fresh on my mind, I knew one way to put those veggies to work. After a few adaptions, we had a pot full of perfectly fall minestrone. Cozy, but also chock-full of veggies, which is just want I look for right after vacation.

Instant Pot Fall Harvest Minestone Soup

Instant Pot Fall Harvest Minestone Soup

Published October 17, 2019 by
   Print This Recipe

Serves: 6   |    Active Time: 30 minutes


Ingredients:

  • 2 ounces diced pancetta or diced thick-cut bacon (optional)
  • 1 tablespoon coconut oil or other cooking oil
  • 1 yellow onion, diced
  • 2 stalks of celery, diced
  • 2 large carrots, diced
  • 4 cloves of garlic, minced
  • 1/2 cup white wine
  • 2 cups diced butternut squash (peeled and seeds removed)
  • 1 16-ounce can cannellini beans, strained and rinsed
  • 1 16-ounce can diced tomatoes
  • 5 cups chicken broth
  • 1/4 teaspoon ground black pepper
  • 1 dried bay leaf
  • 1/2 teaspoon dried thyme
  • 3-4 swiss chard leaves
  • 1/2 cup basil (optional)
  • Salt to taste
  • Optional: 2 cups cooked small-sized pasta, such as ditalini, orecchiette, or gnocchetti (Use chickpea pasta for gluten-free)
  • For serving: grated Parmesan

  • Directions:

    1. Turn Instant Pot to Sauté setting. If using pancetta, place in pot and cook for a few minutes, browning on each side.
    2. If pot is dry, add coconut oil. This can be skipped if there is a good amount of oil in the pot from the pancetta. Place onion, celery, carrots, and garlic in pot, and stir to combine. Sauté, stirring occasionally, until onion is translucent.
    3. Using a knife, remove the stems from the swiss chard leaves. Place the green parts aside (reserve for later) and dice the stems. Add the stems to the pot.
    4. Pour wine into pot. Using a wooden spatula, scrape the bottom of the pot, releasing any brown bits as the wine simmers (this adds flavor to the soup).
    5. Add butternut squash, beans, diced tomatoes, broth, pepper, bay leaf, and thyme to pot. Stir. Place lid on Instant Pot and set to “Bean/Chili” setting. Set timer to 1 minute with vent in the sealed position.
    6. When timer goes off, release the pressure and open the pot.
    7. Chop the reserved swiss chard leaves into bite-sized pieces, and roughly chop the basil. Stir both into the soup. Taste, and season with salt to your preferences (note: store bought broth will likely already have salt in it, so you may not need much. Homemade broth usually doesn’t already have salt, so more will need to be added).
    8. Divide pasta among serving bowls. Ladle soup into bowls, and stir to incorporate pasta. Top with grated Parmesan cheese. Serve hot. Great with a side of garlic bread or crostini!
    9. Note: We stir the pasta into each serving bowl, rather than the whole pot, because if you put all of the pasta into the soup, it will absorb much of the broth, and the next day, you’ll find your leftovers are not very soup-like.

    Instant Pot Fall Harvest Minestone Soup
    Comment

    White Bean Salad with Fried Garlic Toasts

    White Bean Salad with Fried Garlic Toasts

    Low-effort and no-cook are ideal characteristics of a late summer, weeknight meal. Grilling is great, but sometimes you need something even easier—not to mention fresher—to put on the table. This white bean salad has been one of my favorite 15-minute dinners this summer, eaten straight, tossed with a bit of arugula, or best of all, with slices of sourdough that have been fried in butter and garlic. It’s satisfying (beans and feta cheese!) but also delivers some produce (tomatoes, cucumber, parsley). Some might call this an appetizer, but for me it’s just right as a light meal. Happy August!

    White Bean Salad with Fried Garlic Toasts
    White Bean Salad with Fried Garlic Toasts

    White Bean Salad with Fried Garlic Toasts

    Published July 30, 2019 by
       Print This Recipe

    Serves: 4   |    Active Time: 15 minutes


    Ingredients:

  • 1 14-ounce can navy beans
  • 1/2 cup diced cucumber
  • 1/2 cup diced cherry tomatoes
  • 1/4 red onion, minced
  • 1/2 cup feta crumbles
  • 2 tablespoons minced parsley
  • 1-2 tablespoons extra virgin olive oil
  • Freshly ground black pepper
  • Salt to taste (optional)

  • For the toasts:
  • 4-5 slices bread of choice (such as sourdough)
  • 2-3 tablespoons butter
  • 1 clove garlic

  • Directions:

    1. Strain and rinse navy beans. Place in a medium-sized bowl.
    2. Add diced cucumber, cherry tomatoes, red onion, feta, and parsley. Gently stir until ingredients are well distributed. Drizzle with olive oil.
    3. Add freshly cracked black pepper to taste, then season with salt to taste (Note: the feta will also add salt to this dish, so really taste it as you add salt. I find I only need to add a little bit. If your beans were already salty, you may not need salt at all).
    4. Bean salad can be made several hours ahead of time. Cover and place in fridge until ready to eat.
    5. When ready to serve, prepare the garlic toasts: mince garlic. Add garlic, along with 1/2 tablespoon of butter to a skillet and warm over medium heat. Swirl butter in pan to cover the bottom.
    6. When pan is hot, place several pieces of bread in skillet in a single layer. (My 10-inch skillet only fit 3-4 pieces at a time, depending on size. Work in batches.) Toast on the first side for 3-4 minutes. Then, use tongs to flip bread to second side. Add an additional 1/2 tablespoon of butter if pan gets dry. Toast for 3-4 minutes on second side, then remove from pan. Repeat until all slices are toasted.
    7. Serve: top each toast with bean salad and set on serving plates.

    White Bean Salad with Fried Garlic Toasts
    1 Comment

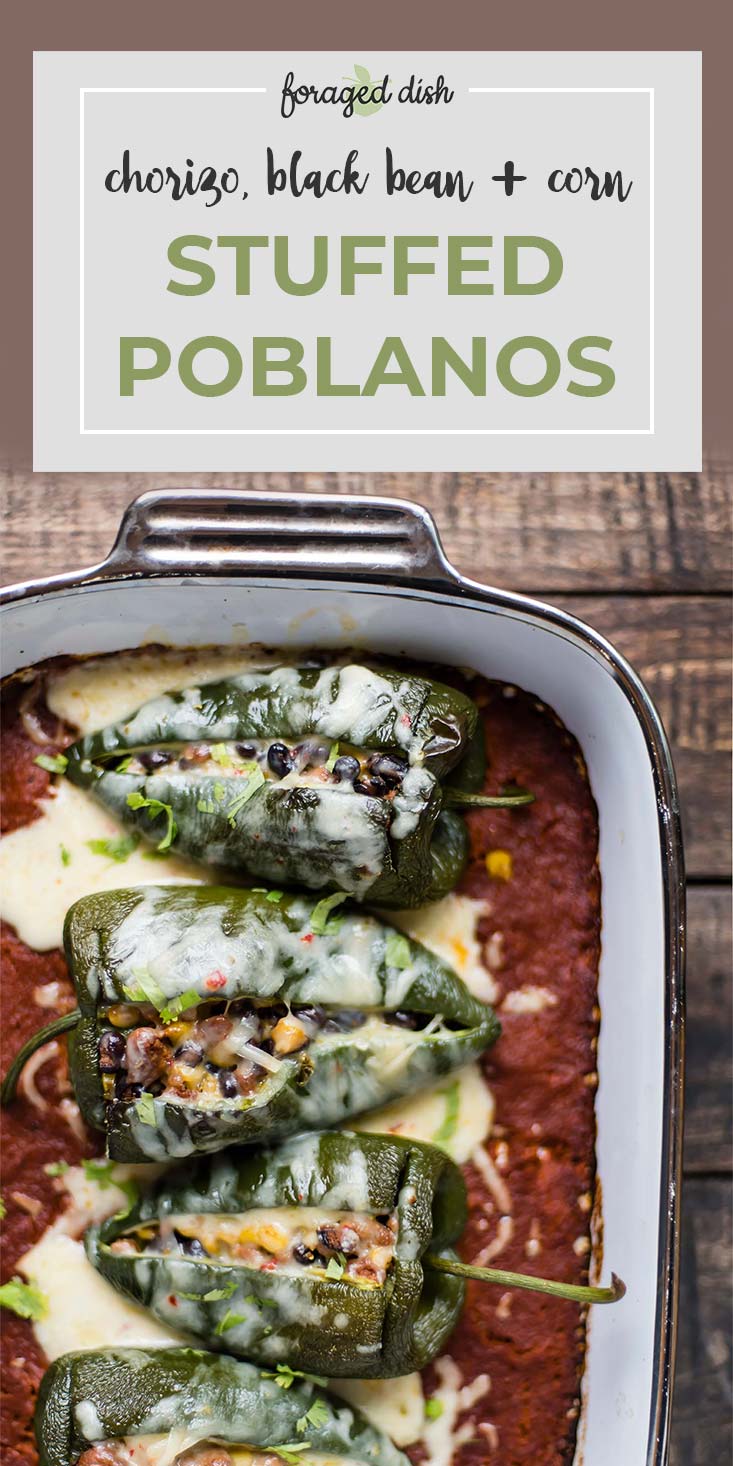
    Chorizo, Black Bean + Corn Stuffed Poblano Peppers

    Chorizo, Black Bean + Corn Stuffed Poblano Peppers

    “Disaster” is not the right word for how poorly my chile rellenos con queso turned out, but it didn’t go well. I harvested six Big Jim peppers from the garden and stuffed them with corn, onions and cheese. They got battered and tossed into a pan to deep fry. Sounds good so far, right? I thought so, too.

    The problem is with what comes next — how I never learn my lesson with frying. With frying, you can’t skimp by using just one inch of oil in a skillet. You have to go all out. You have to commit to a full pot of blazing hot oil which you’ll likely have to toss afterwards. Otherwise, whatever you were frying will touch the bottom of the pan and stick (Yes, even to that ceramic-enamel “non stick” pan you have… Trust me, I would know). The result is typically a pile of whatever you were frying (i.e., peppers) and several hunks of fried batter stuck to the bottom of the pan. I usually try to scrape that batter up. By this time it has turned brown, crispy and greasy. And that will be that: a pile of peppers, and a pile of fried batter bits. It’s delicious, so I suppose it’s not a complete failure. It just isn’t what it’s supposed to be.

    This recipe for stuffed poblanos avoids that conundrum all together. The peppers aren’t even battered, which might initially seem like a disappointment until it’s Thursday at 5:30pm and you’re the one cooking dinner. One less dish, no sputtering pot of oil, and hey — maybe your arteries will thank you, too. 😉Stuffed with chorizo, corn, and black beans, these peppers feel like harvest. Whether you make your own enchilada sauce or not, the dish comes out of the oven looking vibrant and artisan, even after you pile on the grated pepper jack. That’s what I call success!

    Chorizo, Black Bean + Corn Stuffed Poblano Peppers
    Chorizo, Black Bean + Corn Stuffed Poblano Peppers
    Chorizo, Black Bean + Corn Stuffed Poblano Peppers

    Chorizo, Black Bean + Corn Stuffed Poblano Peppers

    Published September 27, 2018 by
       Print This Recipe

    Serves: 8   |    Active Time: 60 minutes


    Ingredients:

  • 8 poblano peppers
  • 1/2 pound ground chorizo
  • 2 cloves garlic, minced
  • 1 cup corn kernels (frozen and thawed or fresh)
  • 1 16-oz can black beans, drained and rinsed
  • 2 cups red enchilada sauce
  • 1 cup shredded pepper jack cheese

  • Directions:

    1. Before you begin: Whenever you are cooking with peppers or chilies, remember that their oils will stay on your fingers. Avoid touching your face (an especially your eyes!) until you are done cooking and have thoroughly washed your hands with soap and water. (Some choose to wear gloves while working with chilies. I find poblanos are not so hot that I need this — but do whatever is best for you.)
    2. Preheat the oven to 425°F.
    3. Brown the meat: heat a skillet over medium heat and cook, stirring to brown all sides and breaking into small crumbles with a spatula. Add the garlic while the meat is cooking.
    4. Once the meat is browned, add the corn and black beans to the pan. Stir so everything is evenly distributed. Turn off heat.
    5. Prepare peppers: cut a vertical slice down each pepper, from the stem to the tip. Near the top of each pepper, cut a 2-3 inch horizontal slice, creating a T-shape. If you would like, use a paring knife to remove the seeds and white pith from the pepper now. This will help tone down the spice of the pepper. We leave them in.
    6. Prepare your baking dish: spread the enchilada sauce in an even layer on the bottom of a 9x13 inch baking dish.
    7. Stuff the peppers: gently stuff the chorizo mixture into each pepper, and then place the peppers in the baking dish. Be careful, the mixture may still be hot! If so, let it cool down so you can handle it with out burning yourself.
    8. Bake for 35 minutes, and then top with shredded cheese. Bake for 5 minutes more and then remove from oven and serve hot.

    4 Comments